Tuesday, August 27, 2013

Stuffed Shells with Meat Sauce (Great for the Freezer!)


  As a very busy mom of two who works full-time, I appreciate having an easy dinner ready to pop in the oven as much as anybody else does!  I refuse, however, to sacrifice great flavor, minimal processed ingredients, and that homemade touch for the sake of convenience.  So rather than purchase lots of boxed freezer meals, I just try to do my cooking a little in bulk and then freeze at least half of what I have prepared.

    One of my very favorite freezer meals is my recipe for stuffed shells with meat sauce.  While I love lasagna, it's hard for me to fit whole pans of it into my freezer.  With stuffed shells, I can simply freeze the quantity of shells I want in plastic bags and then store the sauce separately.  I just thaw the shells and the sauce overnight, assemble the dish in the evening, and then top it with cheese before baking.  With very little effort on a weeknight, I have a great dinner for my family!


   The recipe I use for stuffed shells is actually a lasagna recipe my family has been using for several years.  I love the story behind this one!  Like many other standards in our family, my mom and I had my grandmother's recipe for lasagna and we had never thought to look for a new one.  My sister, however, was sure she had found us a better version.  When she was still in high school, Eva spent the night with a friend whose mother was a great cook.  She made lasagna for the girls and Eva begged Mom to call and get the recipe.  Both Mom and Eva were certain this had to be an old family recipe given that her friend came from an Italian family.  When Mom called to get the recipe, she discovered that the friend's mother had found the recipe in a recent magazine she had been reading!  We have come to love this very authentic "Italian" recipe for lasagna and I have yet to find a better one.

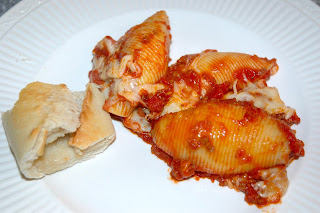
   As I said, I usually prepare this recipe in bulk so that I can have enough for dinner and still store some away for a busy night. I am providing the recipe for one batch of these but know that I almost always double it given that I will always choose cleaning up one mess over multiple messes after I finish cooking.  You can see from this picture how many shells I was able to stuff from a double batch.


    I like to use a pastry bag or just a plastic storage bag with a corner cut off to fill the shells.  I find it makes the whole process much neater and easier than trying to use a spoon.

    After I assemble the shells, I lay them on a baking sheet that will fit in my freezer.  I line the freezer sheet with Reynolds Release Foil so that once the shells are frozen solid on the cookie sheet I can just easily remove them and pop them in a plastic bag.


  I like to freeze the sauce in quart size plastic bags so that I can just place them in a bowl of warm water if I need them quickly and thaw them to the point where I can empty them into a saucepan to warm up.  Sometimes, if I am in a hurry, I just cut the plastic bag off with scissors and throw the whole chunk of frozen sauce into the pan.  I like to heat it a little before I put it over the shells so that it spreads easier and will bake a little faster.

  If I am just making one batch for dinner, I will often double all of the sauce ingredients minus the meat, onions, and garlic just so that I will have a little left over to freeze for something else.

Stuffed Shells with Meat Sauce (click for printable version)

1 lb. ground beef
1 onion, chopped
3 cloves of garlic, minced
1 28 oz. can petite diced tomatoes
1 12 oz. can tomato paste
1 T. sugar
1 1/2 t. salt
1/2 t. each: oregano, thyme, basil (or just use 1 1/2 t. Italian seasoning)
1/2 t. garlic powder
1/4 t. crushed red pepper
1 bay leaf

1 box large pasta shells (I like Barilla best)

15 oz. ricotta
16 oz. mozzarella, shredded
1 1/2 cups Parmesan (I love the Sargento blend with Grana Padano)
2 eggs, beaten
1 T. parsley (I prefer dried)


For the sauce, in a large pot brown ground beef, onion, and garlic until the meant has cooked through.  Drain. Return the meat to the pot and add tomatoes, tomato paste, sugar, salt, and spices.  Bring to a boil, stirring well, and then reduce the heat to low.  Simmer for around 30 minutes without a lid.

Prepare the pasta shells according to the directions on the box.  Drain very, very well.

Mix together the ricotta, eggs, and parsley in a large bowl.  Add the mozzarella and Parmesan saving a little of each to sprinkle on the top of the shells after you cover them in sauce.  Mix thoroughly.

Fill each shell with about 1 1/2 T. of the cheese mixture.

Place the shells in a baking sheet, top with sauce, and sprinkle a little cheese over the top.  Cover loosely with foil and bake for 20 minutes.  Remove the foil and continue to bake until the cheese begins to brown.
Sunday, August 25, 2013

Blond Texas Sheet Cake (Minus the Mustard)


  I have always loved a traditional Texas Sheet Cake and have had this recipe for Southern Living's Blond Texas Sheet Cake for years but have never made it.  Every year the school where I serve as one of the librarians has a fantastic back to school picnic for the staff and faculty families.  Last year I took a traditional Texas Sheet Cake with chocolate cake and chocolate pecan icing.  This year I decided I should finally attempt this recipe that had been sitting in my Dessert/Breads notebook (where I add recipes pulled out of magazines or copied from somewhere else into a binder with sheet protectors).  I made it and WOW, was it a hit!  There was not a single scrap left at the end of the night and I had multiple requests for the recipe.

  Both the cake and the frosting call for buttermilk so I knew right away when I first made it that I had to have Cruze Dairy buttermilk.  Cruze is a local dairy that makes absolutely amazing dairy products.  Their buttermilk has transformed every recipe I have that calls for this ingredient.  My biscuits and pancakes (which I must say, were pretty good to begin with) are absolutely amazing with this buttermilk.  If you are fortunate enough to live close enough to Knoxville, TN, and can get their products, you should definitely pay the little bit of extra cost and purchase them!


   I hosted a dinner party last Friday night and knew that I would have to make this again as my dessert. I began preparing for the dinner party on Thursday night knowing I would like to have much of my cooking and baking done before I came home on Friday afternoon.  Unfortunately, I couldn't begin until after our school's Open House that night which ended around 8:15.  Beginning these projects at 9 pm was probably not my best idea ever as was evidenced by my epic fail in the kitchen.

   I am usually fairly good at multi-tasking and thought I could handle making the cake and a homemade salad dressing both at the same time.  I kept telling myself to make sure I paid attention to what I was doing and not to make any stupid mistakes.  As the cake was cooling I began to cook the frosting on the stove and while it was cooking I started measuring ingredients for my Pecan Vinaigrette.  All was fine until I added the browned butter mixture to my mixer and then threw in a teaspoon of whole-grain mustard that was meant for the salad dressing!  I will admit, I did try it just to see if anyone would notice and although it wasn't horrible, I just couldn't in good conscience serve it to my guests.  I told my principal this story and she thought I should have just added some more mustard and served it up on a cracker!  I ended up throwing it out and starting all over again.  My suggestion to you, dear readers, is to NOT add the mustard in the first place!

Here is the original recipe from Southern Living:

  Blond Texas Sheet Cake (click for printable version)

1 package white cake mix (I ALWAYS use Duncan Hines for cakes)
1 C. full-fat buttermilk (again, Cruze is best if you can get it)
1/3 C. butter, melted
4 egg whites
1/4 t. almond extract (I love the kind I get from King Arthur Flour)

Caramel-Pecan Frosting
1 C. toasted and chopped pecans
1/2 C. butter
1 C. packed light brown sugar
1/3 C. buttermilk (Yep.  Cruze is best)
2 C. powdered sugar
1/2 t. vanilla extract
1/4 t. almond extract

   For the cake, begin by preheating the oven to 350 degrees and greasing a large pan (15X10 inch is the recommended pan size).

  Mix together all of the cake ingredients on medium speed for about 2-3 minutes, scraping down the sides a couple of times.  Pour into the pan and bake for 15-20 minutes.  Cool completely before attempting to frost.

   For the frosting, begin by placing the butter and brown sugar in a small saucepan over medium heat.  Be sure to stir the entire time.  Take it off the heat and then very slowly stir in the buttermilk.  Place the pot back on to the heat and quickly bring it to a boil.  Remove from heat again and then pour it into a mixer bowl.  Slowly add in the powdered sugar, vanilla, and almond extract and beat until it is smooth. This will only take a minute or so.  Add in the pecans and pour it over the cake that has cooled.

Wednesday, August 21, 2013

Fried Green Tomatoes with Roasted Red Pepper Remoulade


    I am not sure you can get much more Southern or much more summer time than fried green tomatoes! I have been making these for years now and get so excited when I see green tomatoes in the grocery store.  Often I am tempted to order them from restaurants and then am sadly disappointed when they don't taste nearly as good as my own.

   I remember reading Fried Green Tomatoes at the Whistle Stop Cafe years ago and then watching the movie when it was released.   Despite the very gruesome ending, I still love both the book and the movie.  I have no memory of ever hearing of friend green tomatoes before this context and it was years before I ever tried them.  I love all things tomato but the thought of unripe ones just did not sound appealing to me.

  The first place I ever tried these was with my husband (boyfriend at the time) and his mom at a chain restaurant called Cook's.  I am not even sure this chain is still around anywhere.  The appetizer was delicious and I soon began ordering them at other places.  My very favorite were from another restaurant chain that is no long in existence called Mick's.  This was an Atlanta chain and they served their tomatoes with a remoulade and feta cheese on top.  Once I began experimenting with making my own at home, I knew I had to duplicate this version.

   I don't love a whole ton of fried foods so for years owning a deep fryer seemed frivolous to me.  I have memories of relatives using Fry Daddies and the amount of grease that ended up on the counter just seemed like too much trouble to me.  Instead, on those rare occasions that I wanted to fry things,  I would just use a skillet or a pot on the stove.  I always struggled, though, to get the temperature right so I finally gave in and bought a deep fryer recommended to me by a friend.  I was amazed at the results and the very little effort it took to clean the machine up!  I highly, highly, highly suggest you think about purchasing the Emeril T-Fal Deep Fryer.  The oil gets filtered and drains into a box that you then very easily repour into the basin the next time you want to fry.  The very best part is that almost every part goes into the dishwasher!


  As for the remoulade, you need to begin making this by roasting your red pepper.  If you have never roasted a red pepper (or a yellow one or an orange one) because it sounds too hard, go buy yourself a pepper to roast right now!  Today!  This is one of the easiest kitchen tricks and the peppers can be used in so many different recipes or just thrown on a salad.

   Cut your pepper in half and remove the seeds. Lay the two halves with the skin side facing up on a baking sheet lined with foil.


   Adjust the oven rack to the very top.  Place the pan in the oven and turn the broiler on high.  Be sure to leave the door open while you do this.  Broil the peppers until the skin is completely blackened.  It will look as if you have ruined the peppers but I promise, this is what it takes to get the skins off easily.


   Remove the peppers from the oven and immediately place them into a brown lunch sack.  Fold the top over and leave them in the bag until they are completely cool.

   At this point, the skins should peel off very easily.  I pulled the peel entirely off of the top one but left the bottom one half way on so that you could see the difference.


  Now you are ready to make your sauce with these!

  Let's talk about frying those tomatoes.  I use a mixture of equal parts seasoned flour and cornmeal.  My mom buys this brand for me in Virginia and brings it down to me when she comes to visit.  It is the best but if you can't get your hands on it, you could use any seasoned flour and cornmeal.


  Before I coat the tomatoes in the cornmeal/flour mixture, I dredge them in a mixture of beaten eggs splashed with a tablespoon or so of milk.  How many eggs depends on how many tomatoes you are frying.  Be sure to assemble everything so that dropping them into the fryer is simple.


Fried Green Tomatoes with Roasted Red Pepper Remoulade

Remoulade Recipe:
1 red pepper, roasted and peeled
1/3 C. sour cream
2 T. cream cheese
1/4 C. mayonnaise
1 T. basil, roughly chopped
2 t. minced garlic
2 t. balsamic vinegar
1/4 t. salt
ground pepper to taste
1/4 t. cayenne pepper

Mix all ingredients in a food processor or blender until smooth.

Tomatoes:
green tomatoes, sliced about 1/4" thick
2 eggs, beaten well
2 T. milk
cornmeal
seasoned flour
vegetable oil
feta cheese

Add milk to eggs.  Mix together equal parts cornmeal and seasoned flour.  Dredge tomatoes in egg mixture and then in cornmeal mix.  Drop into oil heated to 350 degrees in an electric deep fryer or use a skillet with about an inch of hot oil.  You can test the oil in the skillet to see if it is hot enough by sticking the end of a wooden spoon in it.  If strong bubbles build around the spoon, your oil is ready to use.

Fry until the tomatoes are golden brown.  Remove from oil and drain well on a paper towel covered plate.

Top warm tomatoes with feta cheese and serve with Roasted Red Pepper Remoulade.

Tuesday, August 20, 2013

Cowgirl Cookies


    At my house we love cookies.  All kinds of cookie.  Rarely does a week go by that I don't bake some type of cookie.

   One of my daughter's very favorite cookie recipes is Cowboy Cookies.  We discovered these when she was in kindergarten and in a wild West themed room.  Kitely loved to take bags of these to her sweet teacher that year and still drops off a bag at her door any time we make them.

   Given that I have two girls, I decided that we should rename these as Cowgirl Cookies.  Plus, cowgirls just look like they have more fun!

   There are scads of recipes for these cookies on the internet and nearly every version is different.  Mine are no exception.  The combination of ingredients I use separate mine from a few of the others.

   I begin with the base that the Brown Eyed Baker uses which is really not so different from most chocolate chip cookie recipes.  From there I add a couple of items.


    The Heath chips and the Rice Krispies are my secret weapons.  The cereal adds a nice chewy quality and the Heath chips just make these a little more decadent.

   Be warned in advance that this recipe makes a WHOLE LOT of cookies!  Be prepared to give lots of them away.  Also, don't say I didn't warn you that this might be the best raw cookie dough you have ever eaten!

Cowgirl Cookies (adapted from the Brown Eyed Baker's version) (click for printable version)

3 cups all-purpose flour (as always, I recommend White Lily)
1 T. baking powder
1 T. baking soda
1/2 T. cinnamon
1 t. salt
1 1/2 C. butter, softened
1 1/2 C. white sugar
1 1/2 C. brown sugar, packed
3 large eggs
1 T. vanilla
1 1/2 C. semi-sweet chocolate chips
3/4 C. butterscotch chips
1 C. Heath chips
1 C. shredded, sweetened coconut
2 C. oats
1 1/2 C. crisp rice cereal

  Preheat oven to 350 degrees and prepare pans by lining with parchment paper or greasing them.

  In a large bowl, whisk together flour, baking powder, baking soda, cinnamon and salt.

  Using a large bowl, beat softened butter, white sugar, and brown sugar together on medium speed until the mixture is light and fluffy.  Add eggs, one at a time, and then add vanilla.  Turn mixer up to medium-high speed and beat until very light and fluffy.

   Turn the mixer down and very slowly add in the flour mixture.  Do not overbeat.  Once the flour mixture is all combined, add the remaining ingredients, one at a time.  Be careful not to overmix.

   Drop by tablespoons on to the cookie sheets.  Bake for 10-12 minutes or until golden brown.  Be careful not to overbake these.  Allow to cool on the sheets for about 5 minutes before moving the cookies.

Sunday, August 18, 2013

Slice and Bake Crackers


   So maybe my title for this post is just a wee bit deceitful.  Maybe I made you think you could just go pick a roll of these babies up in the dairy aisle beside those cinnamon rolls in a can and have them in mere moments.  I promise, even if you could do that, they wouldn't taste as amazing as these do!

  Now, don't leave me yet!  This recipe really is quite, quite simple and the payoff is great.  Who brings homemade crackers to a party, after all?

   This is yet another recipe shared with me by my friend Angela.  She discovered it in a Williams-Sonoma Thanksgiving leaflet and passed it on to me.  These have since become a Thanksgiving tradition at our house and are served with tiny pumpkins and turkeys cut out of the middles and baked separately.  So cute, they are!

  Plan ahead if you are going to make these crackers because they need a little chilling time.  I actually plan wayyyy ahead and usually freeze them for several weeks before I need them for an event.  I let them thaw in the fridge overnight and then they are so easy to, well, to slice and bake.

  The recipe from Williams-Sonoma offers three different variations on the crackers.  I am a sucker for variations and sometimes have a hard time convincing myself that these are suggestions and not mandates.  I will say, however, that I have tried all three variations and always make the parmesan and the cheddar varieties.  I will never make the asiago ones again, though.  I have no idea why but they made my entire house smell like dog food.  Done.

  You can find the original recipe for Rosemary-Parmesan Icebox Crackers on the Williams-Sonoma website.

Slice and Bake Crackers (click for printable version)

Parmesan Version:

3/4 C all-purpose flour (I rely on White Lily)
1 t. salt (I use Kosher)
1 t. coarse black pepper
2 t. chopped fresh rosemary
4 T butter, cut into small cubes
1 C. grated parmesan cheese (I use the Sargento Artisan Blend which also has some Grana Padano)
1/4 C. whipping cream

Cheddar Version:

1 C. all-purpose flour
1 1/4 t. salt
1/4 t. cayenne pepper (original recipe calls for 1/2 t. but I think this is too spicy)
4 T. butter, cut into small pieces
1 C. grated sharp cheddar cheese
1/4 C. whipping cream

   Combine all the dry ingredients (including rosemary in the parmesan version) in the food processor and turn it on for about 10 seconds.  Here is the before picture.


    Scatter the butter over the top and pulse about 10 times to combine.  The mixture will look a little like sand.


   Add the cheese and pulse several times.

   With the food processor running, very slowly pour in the whipping cream.  Leave the food processor on until the mixture forms a clump in the bowl.  You might think the machine is about to take off from your counter!


    Lay a sheet of plastic wrap on the counter and dump the entire mixture out on to the plasic wrap.


    Using your hands, shape the dough into a small log.  You can make it longer or thicker depending on how big you want your crackers to be.  When I am cutting out my little shapes from the middle at Thanksgiving, I usually make the diameter pretty wide but if I am just slicing and baking then I make smaller crackers.  I also thump the ends on the counter to make them straight.


   Wrap the entire roll in the plastic and place in the fridge for several hours.  Again, you can also freeze these in plastic bags until you are ready to use them.

  Preheat the oven to 325 degrees and line cookie sheets with parchment paper.  Slice the crackers very thinly and as evenly as possible.  Bake anywhere between 20-25 minutes or until they begin to brown.

   These crackers won't keep long once they are baked, so be ready to snack on them or to take them to a party!

Wednesday, August 14, 2013

Brownie Magic


    Tonight  I was in a bit of a rush trying to prepare dinner and (of course) dessert in a little less than two hours after I arrived home.  We had some lovely friends arriving and since I was pressed for time, I turned to one of my favorite recipes from my friend Gloria.

    You have all met Gloria.  She is the quintessential Southern hostess and is the life of the party.  Every event she coordinates looks beautiful and has her own personal touch.  She has magic tricks up her sleeve for entertaining and for cooking.  She is that woman who can make ANYTHING look good!  To top it all off, she is just as kind and welcoming as can be.  

    Luckily for me, I work with Gloria and am the beneficiary of many of her tips and recipes.  We love to swap cooking and baking ideas and fight over the Southern Living when it arrives in our office! These brownies are one of her signature dishes.  Gloria, of course, goes that extra step and layers them with a delicious frosting, but since I am usually out of time, mine are served unadorned!

     I think you will certainly appreciate the easiness of this recipe.  For those of you out there telling me that the pie crust is just a little too much for you to experiment with, then this is the recipe for you!

   Grab yourself a box of brownies (I prefer Betty Crocker) , all the ingredients to make them (eggs, oil, and water), a pan to bake them in, and two XL Hershey Symphony bars.  You can usually find these on the candy aisle as opposed to the baking one.

   Notice how in my attempt to be super-mom, I had already cut off the Box Tops on the box before taking this picture.  Brilliant.


    I always, always, always line my brownie pans (or any bar cookie for that matter) with parchment paper to make it easier to clean up.  I am really lazy like that.  Again, the If You Care brand is great because they are unbleached and come in sheets.


   Begin by mixing the brownies according to the directions.  Spread half the batter in the bottom of the pan.  I use a smaller pan for my brownies.  If you use a 9X13 dish you might want to prepare two boxes of brownies and put one whole mix in the bottom of the pan.

  Here is the really, really hard part.  Break up the Symphony bars and crumble them on top of the batter.  I know you can do it!


    Cover the Symphony pieces with the rest of the batter by dropping spoonfuls on top.  It is kind of hard to spread and some of the candy pieces might poke through the top.  No worries!  The brownies will still taste fantastic!

  Bake according to the directions on the box.  Pull them from the oven and allow them to cool completely.  Cut them into squares and then tote them to the next party you are invited to.  Expect praise!

Tuesday, August 13, 2013

Angela's Chili


    My dear friend Angela and I share lots and lots of things.  Almost everything, in fact.  We share an office with one another.  We share plenty of friends.  We share mothering woes and tips.  We share a car dealership which is how we ended up with identical cars parked right next to each other at work.  We share books.  We share beauty and fashion advice and often share identical taste in clothing.  I could go on and on and on but I am pretty sure you get the point by now.  We have a whole lot in common.

   One of the best things Angela and I share is our love of cooking and baking.  Consequently, we share recipes.  All the time.

   For my entire life, I was completely satisfied with my recipe for chili.  My grandmother had passed this recipe to my Aunt Donna and she in turn passed it to me.  One of the things I loved best about this recipe was that it made an uncluttered chili.  I have realized that I simply just don't like a whole bunch of stuff in my chili.  I get the whole layers of flavors thing; I really do.  Most of the time I love food that is full of interesting ingredients but not when it comes to chili.  I like it uncluttered, if you will.  So the basic recipe I had seemed to work great.  That is until I tasted Angela's chili.

   I had listened to Angela talk about how good her chili recipe was for years, but as usual, I am very stuck in my ways and thought I really didn't need a new recipe for something so basic as chili.  Again, mine worked fine.

    My husband and I somehow began a tradition of making chili and inviting friends over to watch poll results come in on the night of Presidential elections.  This past year, Angela and her family along with two other couples came over for this occasion.  Angela offered to bring a pot of chili over as well so for the first time, I tasted her chili.  There was no going back.  This now had to be my go-to recipe for chili!  My own mother even ended up switching to Angela's chili.  Like our old recipe, it is uncluttered but yet it has a complexity to the flavor.

   I have asked Angela about the origins of her chili recipe because I love to hear the stories behind where treasured recipes come from.  She doesn't remember and says only that she has a hand-written recipe card with the title "My Chili".  I love this and now think of it by that name!

  The key ingredients you need are kidney beans and stewed tomatoes.  I always and only use Bush's Beans in any recipe that calls for beans.  They really and truly are the best.  This is one place where I refuse to buy store brand!  As for the stewed tomatoes, I will be honest, they scared the hell out of me.  I have no idea why but I have never, ever thought they were something I should buy even though I love tomato products of all sorts.  Luckily, I tasted Angela's chili before I asked for the recipe because I doubt that I would ever have been brave enough to face them.  If, like me, you are scared of these cans, just get past it and make the chili.  I love tomato products from The Fresh Market because they are all grown in the US so that's what I always try to use.  I do use my kitchen shears to cut the tomatoes into smaller pieces once I add them to the ground beef as they usually come out of the can in big pieces.


   This recipe requires very little time to assemble and is great for weeknights after work and school.  I now even keep plastic bags in the freezer with pre-browned ground beef and onions in them so that we have it ready to just set to simmer.  Even if you are completely satisfied with your chili recipe, just give this recipe a try one time so that you can see how delicious it is for yourself!

     Angela's Chili
1 lb ground beef
1 c. chopped onion
2 (1 lb) cans stewed tomatoes
2 (1 lb) cans kidney beans, one light and one dark
2 T. chili powder
1 tsp salt (regular table salt, not Kosher or sea)
2 T. white sugar
2 T. cider vinegar
2 t. garlic powder

In a heavy saucepan, brown ground beef & onions until beef is done and onions are transparent. Drain grease if needed. Add tomatoes and chop with kitchen shears into smaller pieces.  Add remaining ingredients and simmer for 20ish minutes. 

Angela recommends making this the day before or the morning of the day you plan to serve it so that the flavors have time to develop.


Sunday, August 11, 2013

Meringue Three Ways -- Part Three -- Meyer Lemon Meringue Pie


     I know you have been waiting with baited breath for the finale to my trilogy, so without further adieu, here it is . . . a Lemon Meringue Pie!  

     Again, I can hear you out there telling me that this is too much bother and that you will stick with the one from the freezer or your local grocery store.  People, I have seen these grocery store versions.  The shade of yellow in those pies is utterly frightening.  Do yourself a favor and go pick up those lemons from the produce section.  After you take your first bite of your homemade lemon meringue pie and have called everyone you know to tell them how you accomplished it on your own, I will wait for your comments on this post!

     Let's start by talking about lemons.  The regular, big yellow ones from any grocery store will work fine.  I promise.  I will tell you, though, that if you are fortunate enough to find Meyer lemons that are in season and you choose to make your pie with those that you might think you have died and gone to Heaven.  Meyer lemons are amazing.  They are smaller than regular lemons and have a more orangey and thinner peel.  They actually taste a little orangey.  In the dead of winter nothing makes me feel happier and healthier than slices of these little gems in my water.  It's hard for me to do them justice with words.  Just trust me and pick one up if you see one in your grocery store.  And by all means, if you find enough ripe ones to use in this pie, DO IT!  Thank me later.

   We need to discuss the filling for a minute.  Until very recently, every custard, pastry, or pie filling I made was a disaster.  I mean, an absolute abysmal failure.  No matter how hard I tried to slowly add my egg yolks into the hot liquid on the stove just like the instructions told me to, little by little, I inevitably ended up with tiny bits of cooked egg in the filling.  Gross. NOBODY wants scrambled eggs in their pie.  Luckily for me, my sister had the smarts to marry a for real chef.  No kidding.  We now have a chef in our family.  It's like a dream come true for all of us.  Now any time I have a kitchen quandary, I just call Chef Chad.  I have my own personal cook's line and I LOVE it!  So my brother-in-law's genius advice was to stop following the directions in my cookbooks and switch to adding the hot liquid to the eggs itty bitty bit by bit.  He told me that I could not add the liquid too slowly or in too small of batches.  I tried it in this pie and lo and behold, the boy was right!  Trust Chad on this.  Really, really trust Chad.  I am thrilled that never again does anyone have to smile politely at me as they eat my rubbery egg custards.

  I also want to add a few words about the meringue here before I give you the recipe.  Again, make sure your egg whites are at room temperature and that your bowl is super clean of any tiny bits of debris.  It makes a difference.  Also, be sure your filling is completely cool before you spread the meringue over the top of it.  The other important reminder is that you need to spread the meringue to the very, very edge of the crust or else it will pull off the crust as it bakes.  I even go a little ways up the side of the crust just to be sure that it has adhered well.

   Whew.  That is a great deal of information about this pie but I feel like if it's worth you taking the time to make it that you should know all of the little tricks I used to make it work.

   I pulled my ingredient list and most of my technique from my go-to resource, The America's Test Kitchen Baking Book.  

   Once again, I would urge you to either buy this book now or put it on your birthday list.  It's that good.

Meyer Lemon Meringue Pie

1 pie crust.  For homemade, see my recipe

Filling:
1 1/2 C. cold water
1 C. granulated sugar
1/4 C. cornstarch
1/8 t. salt
6 large egg yolks
1 1/2 T. grated lemon zest from Meyer lemons
1/2 C. fresh Meyer lemon juice
2 T. salted butter cut into tablespoons

Meringue:
3/4 C. granulated sugar
1/3 C. water
3 large egg whites, room temperature
1/4 t. cream of tartar
1/8 t. salt
1/2 t. vanilla

    Begin by preparing your pie crust well ahead of time.  Heat your oven to 375 degrees. Roll the crust out and place it in a pie pan.  Flute the edges.  You are now going to blind-bake it which simply means that you will bake it before you fill it.  You have to make sure it doesn't puff up while it bakes so you will need to weight it down.  I prefer to use a pie weight chain that I ordered from the King Arthur Flour website.  I love this one because it all comes out in a chain and you don't have to worry about individual weights.


    If you don't have pie weights, don't worry!  Just lay some foil in your pie shell and place a handful of either pennies or dried beans in it and you will get the same effect.  I actually ended up taking the chain out of this crust after I took the picture and putting a layer of foil on before I placed it back in.

    Bake the crust with the weights in it for about 30 minutes until it looks just pale in color.  Take the foil and the weights out of the crust and then finish baking it until it is a nice brown color which will probably take another 10 minutes.  This is really the only chance you have to make your crust golden so be sure you let it finish baking.  If you made it from scratch, you will have fabulously flaky layers in it!  When you take it out of the oven, place it on a cooling rack and allow it to cool completely.  Don't try to rush this step.  That's why I told you to start early!

    While your crust is cooling, you can get your filling ready.  Add the water, sugar, cornstarch, and salt to a large pot.  You will need to make sure you have plenty of room to whisk.  Turn the heat to medium and whisking constantly (DO NOT WALK AWAY!), bring the liquid to a low simmer.  The mixture will start to turn cloudy and then will quickly become translucent.  This is how you know it is time to add the eggs.  

    
    I would suggest that you have your 6 egg yolks right by the stove in a larger bowl than you think you will need since you are going to add the hot liquid into the yolks.  Using a spoon, little by little (think tablespoon at a time), add the cornstarch/sugar mixture to the egg yolks, whisking well after each addition.  When the egg mixture seems to feel pretty hot, add the yolk mix to the remaining liquid in the pot and whisk very, very well and very, very quickly.  At this point add both the lemon zest and the juice.  Whisk briefly and then add the butter in.  Let it come back to a tiny little simmer and then TAKE IT OFF THE HEAT UNLESS YOU WANT GROSS EGG BITS IN THE FILLING!!  I speak from experience.  Lots of experience.

   Make sure the crust has cooled completely and then pour the lemon filling into the shell.  Cover the pie with plastic wrap and then put it in the fridge until it is completely cool.  This will take between 1 1/2 and 2 hours.

   Once the pie is completely cool, prepare the meringue by adding the sugar and water to a pot and allowing them to come to a full boil using medium-high heat.  Stir the mixture constantly and cook it until it becomes just a little thick and looks syrupy.  This will take about 4 minutes.  Take it off the heat and place plastic wrap over it to keep it warm while you prepare the egg whites.

    Begin by whisking the egg whites, cream of tartar, and salt together in a mixer (preferably a standing mixer) on low until it starts to look foamy.  This only takes about a minute.  At this point turn the mixer up to medium-high and whisk the egg mixture until it becomes shiny and you can see soft peaks when you pull the whisk up.

   Turn the mixer back down to medium and very, very slowly, pour in the hot sugar mixture.  If you can, try to pour it down the middle while avoiding the sides of the bowl and the whisk.  

   Pour the vanilla into the mixer bowl and then turn the mixer back up to medium-high.  Keep whisking the meringue until it is very thick and shiny.  This will take anywhere from 3 - 5 minutes.

   Remove the pie from the fridge and add the meringue by spoonfuls onto the filling.  Smoothing it out as you go, spread the meringue all the way to the very edge of the pie crust.  


     Now, here's the really fun part!  Take a spoon, turn it over so that you are using the back, and start making all kinds of fun swirls and swoops on the meringue.  Just don't go too crazy and pull the meringue off the filling!


    Place the pie on a baking sheet and bake in an oven preheated to 400 degrees until the meringue is a nice toasty, brown color.  This won't take long and it should be done around 7 - 8 minutes.  Remove the pie from the oven and place it on a cooling rack.  Allow it to cool completely for close to 2 hours.  This is the hard part!  Trust me, though, and let it cool completely before you cut it.  Serve it at room temperature.

Thursday, August 8, 2013

Meringue Three Ways -- Part Two -- Viennese Bars


    Next up in my meringue trilogy is a dessert that it only a tab bit more complicated than my recipe for the Forgotten Cookies that appeared on the first installment.  Read the directions through before you begin and allow yourself a little time for these.  They are delicious and are a little less common that most desserts you see at your typical potluck.

   I am a sucker for any new bar recipe I see.  I love bar cookies for a number of reasons but mainly because they are perfect for feeding a large group of people and don't require a plate or any kind of utensil.  I often host a 4th of July party and our dessert theme is always bars.  I love finding new bar recipes and then seeing what my friends choose to bring to share.  This year my little family and I spent the 4th of July with my sister and her husband (who incidentally is a REAL LIVE CHEF!) in Atlanta and while I was happy that we could be with them, I was also a little sad thinking that there would be no bar themed dessert table this year.  While we were planning our menu for the day, my sister alleviated my sorrow by telling me that she was planning on making a couple of kinds of bars!  Luckily, I had already been dreaming of a new bar recipe from my latest Southern Living magazine and was ready to try it out.

  From what I have researched, different versions of Viennese Bars have been passed around for quite a while and the one in SL came from a cookbook which featured the recipe from Nancy Reagan.  Given our current first lady's stance on healthy eating and the ingredient list in these bars, I doubt Mrs. Obama will be sharing her version of the recipe any time soon!

   The recipe begins with a blind-baked (unfilled) shortbread type crust and then has a layer each of raspberry jam and semi-sweet chocolate.  The entire concoction is then topped with meringue mixed with nuts.  They are so pretty once they are cut and you can see the various layers.

  Here is the recipe from Southern Living with a few minor adjustments I made:
  Crust:
                1 c. butter, softened
                1/2 c. white sugar
                2 large egg yolks
                2 1/2 c. all-purpose flour (I always and only use White Lily)
                1/2 t. salt

  Filling:
              10 oz. seedless raspberry jam
              1 c. semi-sweet chocolate chips
         
  Meringue Topping:
              4 large egg whites, room temperature
              1 c. white sugar
              1/2 t. salt
              1 t. vanilla
              2 c. lightly toasted and finely chopped walnuts

     Begin by pre-heating your oven to 350 degrees.  Place parchment paper on a large jelly roll pan or glass dish.  I use a glass dish for this recipe.

     Beat the butter and the 1/2 c. sugar on medium.  Mix thoroughly.  Add egg yolks, one at a time, and beat well between each yolk.  Mix together the flour and the salt and add to the wet mixture gradually.  Press the dough into the bottom of the lined pan making sure that you are evenly distributing the crust.

      Bake for about 20 minutes or until it is golden brown but not overly cooked.

     While the crust is baking, go ahead and prepare the meringue topping.  Place the egg whites in the mixer and beat on low speed with a whisk attachment until they look foamy.  Slowly add the sugar, salt, and vanilla and turn the mixer up to medium high speed.    Beat until the mixture turns shiny and thick and has stiff peaks.  Very gently add the walnuts and fold them in with a spatula making sure you don't deflate the egg whites.


     Immediately after removing the dough from the oven, spread the raspberry jam over the crust and then top with chocolate chips.  Spread the meringue carefully over the chocolate chips making sure you do not drag the chips along.


    Return the pan to the oven and allow the bars to bake for about 30 -35 minutes until the top is browned and looks crunchy.  Let the bars cool thoroughly before attempting to cut them.


Wednesday, August 7, 2013

Meringue Three Ways -- Part One -- Forgotten Cookies


     Like pie crusts, I know that many of you may think of meringue as flat out just too difficult or too time consuming to mess with.  Just like you, I walk past those meringue pies in grocery store bakeries and am tempted to pick one up.  On the rare occasion when one does land in my cart, I usually remember that the highly manufactured stuff just isn't worth the calories and I end up putting the pie back.  Homemade meringue products, however, are an entirely different story.  They are totally worth the calories!

   In an attempt to encourage all of you to experiment with meringue, I want to share three different uses of meringue in recipes of varying degrees of difficulty.  The basic one is so basic and so, so yummy that I feel certain you will try it soon!  The moderately challenging one is great for taking to social events where you want to wow your family and friends a little with an uncommon dessert, and the last one, well, the last one is . . . a homemade lemon meringue pie!

  In all three recipes, you will need to remember some basics about meringue:
     1.  Your egg whites must be at room temperature.  Just trust me on this one.
     2.  Your egg whites must be clean.  Don't let any of that yolk sneak in!
     3.  Your bowl must be super clean and dry.
     4.  Meringue takes a little while to whip up nicely.  Don't rush it.

  So let's start with what I consider to be a fairly simple recipe for Forgotten Cookies.  When I was little, I had a friend whose mother used to make these.  My mom loved them and still fondly remembers these cookies.  Somehow, she never got the recipe from this woman.  While I was in college, my friend Carol, author of the blog CafeCarol.com shared with me a recipe for Bake While You Sleep Cookies that I knew had to be the same cookies my mom had loved.  Even if it is not exactly the same recipe, I have come to treasure this recipe typed up on a little red piece of paper.

    The beauty of this recipe is that you mix them the night before, pop them in the oven, turn the oven off, and in the morning you have little meringue cookies fresh out of your oven.  One of my favorite parts about making these is how divine your house smells when you wake up!

Forgotten (or Bake While You Sleep) Cookies

2 egg whites
1 c. very finely chopped nuts (I prefer pecans in these)
pinch of salt
2/3 c. sugar
1 c. miniature chocolate chips (my favorite ones to use are the Guittard semisweet mini chips from King Arthur Flour.  These are PERFECT for these cookies and have lots of other uses as well)
1 tsp. vanilla

  Begin by lining cookie sheets with parchment paper.  I LOVE parchment paper and actually do not know how to bake without it at all.  I never, ever grease a pan for cookies or brownies.  I can't remember the last time I had any baked good stick on these.  The sheets can be reused for your whole batch of cookies.  I prefer to use these from If You Care mainly because I can buy them in a local store.


 They are already cut in sheets and make the whole baking process so much easier.  King Arthur Flour also carries half sheet parchment sheets on their website as well.

 If you don't have parchment paper, line the sheets with foil and spray them with non-stick cooking spray.  Next time you make these, though, go ahead and buy the parchment.  You will thank me, I promise.

 While you prepare the cookie batter, preheat the oven to 350 degrees.

 Beat your egg whites  on medium- low with a mixer (a standing one is better for this job if you have one) until they begin to look foamy.  Slowly add the sugar and then turn the mixer on medium high.  Continue to beat the egg whites until they are stiff.  This will likely take quite a few minutes.   Just one reason why the investment in a standing mixer is so worth it!

  Once the egg white mixture is very thick and stiff, turn the mixer to low and add the salt, nuts, chips and vanilla just until mixed in.

  Drop the batter by teaspoons on to the parchment lined sheets.  You can place the cookies fairly close together because they won't spread much at all.

  Place cookie sheets in oven and TURN THE OVEN OFF immediately!  This is very, very important!  Don't forget!  I have forgotten before.  Don't forget!  The whole point is to forget about the cookies, NOT TO FORGET TO TURN THE OVEN OFF!

  Now, this is an important step.  Go to sleep.  Just go to sleep.  When you wake up, you will have beautiful meringue cookies and you will be tempted to give in to your children's pleas for cookies for breakfast because the whole house smells so good.  Often, I just give in.
 

Sunday, August 4, 2013

Tomato Pie -- Summer in a Shell


     Each summer it seems as though I find a new food to latch on to.  I find myself repeating a recipe, attempting to perfect it, and then serving it to anyone willing to try my latest find.  Always there is some ingredient that relies on being eaten in the summer.  I recall one year quite vividly when I discovered bruschetta; I feel certain that I had more than one group of friends who wished I might move on from my favorite new dish.

     I firmly believe that the summer of 2013 will be fondly remembered as the summer I served tomato pie.

   If you have never had a chance to try one of these Southern delights, then you really need to go to your local farmer's market right now, purchase a couple of pounds of the freshest tomatoes you can find and a handful of basil, stop at the grocery store on the way home for the other few ingredients, and MAKE A TOMATO PIE!  I promise, you will be more than glad you listened to me on this one.

   I actually had never heard of a tomato pie, much less eaten one, until last summer when my dear friend Sundi and her husband Dave pulled a fresh one right out of their Charleston oven.  I know I had at least two, if not three, slices of pie that evening.  It was truly one of the most delicious foods I had ever tasted.  Looking back, it makes perfect sense that Sundi would serve this dish.  Sundi is South Carolina sunshine inside and out and is the perfect Southern hostess.  I love regional dishes and have since researched this amazing find.  It turns out that tomato pies pop up on many menus around the South, but particularly in the Carolinas.  I found a fantastic article from the Boston Globe that showcases one Carolina family who bake these pies and sell them from their farm stand.  A simple Google search will yield you more than your fair share of various recipes.

   While my family and I recently vacationed on Hilton Head in South Carolina, we discovered the most charming little market and restaurant called Low Country Produce Market and Cafe.  The Low Country Produce company manufactures some amazing products that come from old family recipes and support local farmers.  I had recently discovered the company when I purchased some pepper jelly made by them here in my own northeast Tennessee hometown so I was thrilled to find this cafe and market on vacation.  Turns out they have their own version of tomato pie so I had to purchase one for lunch one day.  They use a pimiento cheese base in their pie and incorporate their jarred onion jam into the recipe.  The pie was quite different from the one I have been making, but still delicious.  If you are on Hilton Head Island any time soon, do yourself a favor and stop by this market for a slice!

    As for my own version of the pie, I began with a recipe from the The Tupelo Honey Cookbook:  Spirited Recipes from Asheville's New South Kitchen and then changed it a bit to make it my own.  Tupelo Honey recently opened a restaurant here in town and it is truly one of my favorites.  They began in Asheville and have slowly begun to open more and more restaurants around the Carolinas and Tennessee.  If you are ever near one, the wait is certainly worth the food.


    It turns out that according to my expert on tomato pies, my friend Sundi, there is a bit of a divide in the tomato pie making community.  One camp defends the double crust version (which is the kind Sundi and Dave serve) and the other calls for just one crust on the bottom and more filling.  I have eaten both and find them to be equally satisfying.  For me, the single crust is just the easier choice since I only have to deal with one pie crust so that tends to be my go-to version.

    The recipe from Tupelo Honey Cafe contains only one crust so that's where I started.  You can find the Tupelo Honey Cafe Tomato Pie original recipe right on the website along with a little more information on varieties of tomatoes.  I did change it a little so here is my own version:

Ingredients:

One single pie crust -- I STRONGLY suggest you put your newly perfected pie crust skills that you found on my last post to work here but if you must, purchase a pie crust from the freezer section

2 lb. fresh tomatoes -- I like to use a variety of yellow and red

2 cups shredded sharp cheddar cheese -- freshly grated melts best (the better the cheese, the better the pie)

4 T. shredded Parmesan cheese

1 C. mayonnaise

1 t. ground pepper

3 chopped green onions

2 T. chopped fresh basil

1 C. plain panko crumbs


1.  Heat oven to 425 degrees.

2.  Begin with your tomatoes.  Slice them all 1/2 " thick.  For my latest pie, I visited my farmer's market and found this beautiful bowl of tomatoes.


3.  Roll out your pie crust and place it in a deep dish pie pan.  If you are using a frozen crust, prepare it according to the directions on the box.

4.  Stir together all of the other ingredients, saving tomatoes for assembly.


4.  Layer your pie beginning with tomatoes.  Place one third of the tomatoes in the bottom of the pie crust.  Top with one third of your creamy cheese mixture.  Repeat twice more and end with the creamy cheese mixture on the top.

5.  Bake for about 35-40 minutes or until the pie is hot and the top is brown.  You may need to cover your crust during the last part of the baking.

   Now, aren't you grateful you learned how to make that pie crust from scratch and can abundantly share this tomato pie recipe at every function you attend during tomato season?

Friday, August 2, 2013

Yes. I am starting with a pie crust.


     I really and truly have chosen a pie crust as my first recipe post on this blog.  I know, I know.  I can hear you already talking yourself out of reading this all the way through or of thinking you should attempt to make your own crust from scratch.  I have heard your reasoning in the voices of my friends through the years.  "Why in the world would I make my own pie crust?  I can buy them at the grocery store and they taste just as good."  "Pie crusts are too complicated.  There is NO WAY I can do this; let me leave those to the REAL bakers."

     Well, I am here, friends, to challenge you to not only keep reading but to put your aprons on and pull a made-from-scratch from your very own ovens!  I have faith that you can all do this.

     Let me begin with your first argument that the ones in the grocery store are just as good as the ones you make with your own hands.  While I will concede that there are a couple of brands that taste fine and will do in a pinch, I still say that homemade crust wins every day hands-down.  Not only do they taste better, think of all those ingredients that you can't pronounce much less identify.  I am here to offer you nothing more than butter, shortening, flour, salt, sugar, and water.   My guess is that most of you have those six ingredients in your kitchen right now.

    As for your second point about pie crust being something best left to the professionals, I have one word.  Bologna.   If I, just a little -better- than- average home cook can do this, so can you.  I have absolutely NO professional culinary training and yet I pull perfectly flaky, delicious crusts from my oven on a regular basis.  What I do have is a passion for research and I have researched the heck out of pie crusts.  You are here to benefit from my time spent researching.

    Let's get started with this pie crust project that you have now committed yourself to.  You will need:

  • A cheese grater (yes, a cheese grater)
  • A big bowl
  • A medium sized bowl filled with ice and water
  • Measuring cups and spoons
  • Waxed paper
  • Plastic wrap
  • Glass pie pans 
  • A food processor 

     OR a pastry blender

     For many years I have been researching and testing various recipes and techniques and have ultimately combined several different ones to make pie crust work for me.  My ingredient list comes from The America's Test Kitchen Family Baking Book.  This book is my go-to source for all baking basics.  I recommend this book for EVERY home cook's shelf!


For a double crust, you will need:

2 1/2 cups all-purpose flour (I prefer King Arthur's Perfect Pastry Blend or White Lily all-purpose)
2 T. sugar
1 t. salt
6 T. vegetable shortening
10 T. salted butter
8-12 T. ice water

The night before you plan to make your crusts, cut the shortening into small cubes and place in a small bowl covered in plastic wrap.  Put the entire bowl in the freezer.  

Freeze your butter (still in stick form) in the freezer the night before, as well.

Begin making your crust by first grating your butter on a cheese grater over a plate.  Do this very, very quickly so that the butter doesn't melt.  Be sure to pull all of the butter out of the middle of your box grater since it tends to clump. Don't worry about the last few bits that are left.  Just cut them into small pieces.  Place the entire plate of grated butter in the freezer until you are ready to add it to the flour mixture.


Go on and get your ice water really cold and ready to use in a few minutes.

Using either a food processor or the pastry blender, thoroughly mix together the flour, sugar, and salt.  If you are using a food processor, just process it for about 10-20 seconds.

Drop the shortening pieces directly on the flour mixture and turn on the food processor for about 15 seconds or until the mixture feels somewhat like sand.  With a pastry blender just keep working it until the texture is the same as with the food processor.

Add the butter to the top of the mixture and just pulse it about 10-15 times.  Don't worry about getting it all mixed in uniformly; you want these little butter and shortening clumps to help create the steam for your flaky layers.

At this point dump all of the ingredients in a big bowl and grab a spatula.  Here is where you have to be  REALLY, REALLY careful!  My tendency is to man-handle the dough and you do NOT want to do that!  

Sprinkle the minimum amount of water on top of the dough, tablespoon by tablespoon, and VERY gently start mixing the dough together.  According to Beth M. Howard, author of Making Piece:  A Memoir of Love, Loss, and Pie and the blog The World Needs More Pie, you are simply "fluffing" up the dough with the water.  


You will more likely than not need more water than the minimum.  Just be sure to add it slowly and tablespoon by tablespoon.  You just want the dough to come together when you press on it a little.


At this point, many cooks choose to shape the dough with their bare hands.  This method does NOT work for me at all and this is where I think my preferred method makes for the better pie.  While I won't pretend that I understand the exact science behind it, I can tell you for certain that you need those little clumps of butter and shortening to help make the flaky layers and I really can't keep those clumps if I touch the dough.  I think my hands are just too hot!  

Instead of shaping my dough with my hands, I pull out two very large sheets of plastic wrap and place them on the counter.  Once I have enough water in my dough, I just divide the dough in half (as best you can) and dump half of it on each piece of plastic wrap.   I find it easier to lay out one piece of plastic at a time and work with just half a batch of the dough at a time.


Begin pulling the opposite corners of the wrap together and squishing the dough together this way.  You will need to alternate corners and rotate the wrap.  Once it has come together, you can shape it in a disc through the outside of the wrap.  You want a disc that is about 4 inches wide but don't worry about  being too exact with the size.  You are going to roll it out anyway.  


At this point just wrap it tightly with the plastic wrap and maybe another piece, as well.  You can then just freeze it in a freezer bag for several months.  I usually try to make at least 6-8 crusts for the freezer every time I make them because the real work is cleaning up the mess!  If you do freeze them, just be sure to put it in the fridge to thaw several hours before you need one.

If you are planning on making a pie right away, put the wrapped dough in the fridge for at least an hour.  

Remove the dough from the fridge and let it sit out for about 10 minutes before attempting to roll it out.

Again, I try to avoid touching my dough at all, so I roll my crusts out between two pieces of floured waxed paper.  Just be sure to keep turning it and lifting the paper up at times so that it won't stick to the waxed paper.  I don't worry too much about keeping it in a perfect circle because I end up trimming it after I place it in the pie pan.  Just be sure that you have rolled it out to be slightly larger than your pie pan.


Remove the top piece of the waxed paper and place the exposed side in the pie pan.  The good part about this method is that you can still move the crust around a little before settling it into place if you need to.  Carefully and slowly remove the piece that is now on top and begin to press your crust into your pan.   Just don't touch it too much or you will melt those clumps of butter and shortening!

Once you have your pie in the pan, trim the excess off and either flute the edge or simply press a fork into the crust.

Place the entire pie pan in the freezer for about half an hour to get it good and cold again.

You are now ready to bake a pie of your choice!  Just follow the directions for your pie recipe as some call for a blind-baked crust (pre-baked) and some call for you to just fill the pie straight from the freezer.

Remember that practice makes perfect and I promise you, this practice is very worth the effort!